Creating a Gatsby Blog Site
Series:Building A Powerful Blog
Hello and welcome to the first post in my new series on Building a Powerful Blog!🎉 I have been writing blog posts for over a year now and recently made the decision to add them to my personal portfolio website. This decision stems from several different reasons but the main reason is because I view my blog posts as an extension of myself and my thoughts. With my portfolio being in place to display who I am as an individual, it not only felt right, but necessary to add my blog posts to my site.
Throughout this series, we'll be using Gatsby as the framework, GraphQL as the data layer, and Netlify as the CI/CD pipeline. We'll be covering everything you need to know to get your first blog site up and running, including a basic understanding of how Gatsby sites work, how to utilize the numerous Gatsby plugins, and incorporating GraphQL as your data layer. These solutions will help create a fully functional, streamlined, no-database solution for presenting your work to millions.
Why Use Gatsby?
While there are numerous ways to go about creating and deploying your own site, I wanted to show you the path I chose for creating my blog site. I decided to use Gatsby for this site for various reasons. As I've become very familiar with the React library and wanted to learn more about GraphQL, Gatsby was an easy choice for me. It combines these two tools to help you build fast and secure websites, where integration of various content, APIs, and services helps create a very powerful web experience. They also have improved security as statically generated sites have less vulnerabilities than traditional websites. If you're interested in learning more about Gatsby before continuing on, feel free to check out their Why Gatsby page for more details on the power and functionality of this framework.
All of the features provided by Gatsby make it the perfect framework to use for something like a blog site. As a Static Site Generator (SSG), Gatsby uses Server-Side Rendering (SSR) APIs to create static HTML when building your site, instead of upon request from a user. This gives you the SEO and social sharing advantages of SSR, with the speed and security of SSG. Gatsby will help create a lightning-fast Progressive Web App (PWA) right out of the box, giving you a site that can be saved to a user's mobile device to view while off-line, with pages that load in milliseconds and incredibly smooth transitions.
To create our site, we will utilize Gatsby's Command Line Interface (CLI) to get things started and then just a couple of steps afterwards to get your site deployed to Netlify. Before we get started though, there are a couple of items that need to be addressed. To keep this post on topic, it's assumed that you have a basic understanding on the fundamentals of web development. This includes HTML, CSS, JavaScript, the command line, and React. I'm also assuming that you have Node.js (v14.15 or newer), Git, Gatsby CLI, and Visual Studio Code installed and ready to go on your local machine. If you're unsure about any of these topics, I would recommend walking through the Gatsby tutorial to Set Up Your Development Environment. There's some great information in there to make sure you're ready to go with creating your Gatsby site. With that out of the way, below are the steps we will follow to make it all happen:
Creating the Gatsby Site
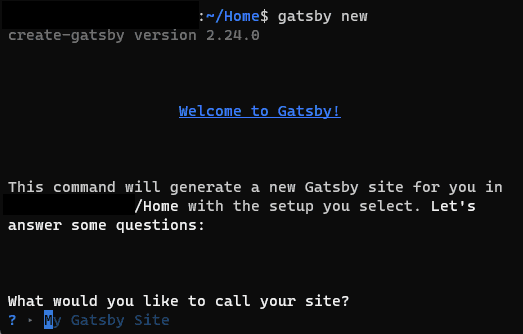
To create the basic template for your Gatsby site, you'll need to open up your terminal and enter the command gatsby new into the Gatsby CLI. This will bring up an interactive prompt, asking you questions about the site you are trying to build.
If you are having trouble with the Gatsby CLI, you can also create the site by running npm init gatsby from the CLI instead. There are several questions that need to be answered before your site can be created. Your answers to these questions are your choice but I'll provide some insights into potential answers based off my selections.
What would you like to call your site?
  ✔ · Personal Website
What would you like to name the folder where your site will be created?
  ✔ personal-website
✔ Will you be using JavaScript or TypeScript?
  · JavaScript
✔ Will you be using a CMS?
  · No (or I'll add it later)
✔ Would you like to install a styling system?
  · No (or I'll add it later)
✔ Would you like to install additional features with other plugins?
  · Add responsive images
  · Add an automatic sitemap
  · Generate a manifest file
  · Add Markdown Support (without MDX)
The options selected will help by installing additional features and plugins during the creation of your site, avoiding the need to do so later. For this site though, only those four additional features from the last question will be needed. This will update your gatsby-config.js file with templated options for each plugin to get you started.
While you might be tempted to select the Google Analytics tracking script option, I would recommend against it. This selection will install the gatsby-plugin-google-analytics plugin, which Gatsby actually recommends against installing, as it utilizes analytics.js, which is an outdated Google tagging system. Instead, you should install the gatsby-plugin-google-gtag, which utilizes a Global site tag (gtag.js) to combine multiple Google tagging systems and replace older ones, such as analytics.js. We will cover the installation and implementation of this plugin in a future blog post on Improving SEO, so we can avoid worrying about this now.
Selecting the addition of responsive images, a sitemap, Markdown support, and generating a manifest file are all very valuable items to add to your site during creation. While these can be done at any point you want, adding them now just helps check off a couple more items from the to-do list. For example, selecting the Add responsive images choice will install gatsby-plugin-image, gatsby-plugin-sharp, gatsby-source-filesystem, and gatsby-transformer-sharp, while also adding them into your gatsby-config.js file. The will handle the hard part of producing images in various formats and multiple sizes for you. From here, all you will need to do is import and use the StaticImage and/or DynamicImage components into your pages and Gatsby will handle the rest. The other selections you choose during the creation of your site will follow the same pattern. They'll install their necessary packages and update the gatsby-config.js file for you so you can begin using them from the very beginning. How cool is that?!
We, of course, will be getting into more details on how to utilize these various plugins as we progress through the creation of your blog site. If you interested in learning more about them now though, I've added the packages installed by the selections specified above, as well as their respective links:
- Add responsive images:
- Add an automatic sitemap:
- Generate a manifest file:
- Add Markdown Support (without MDX):
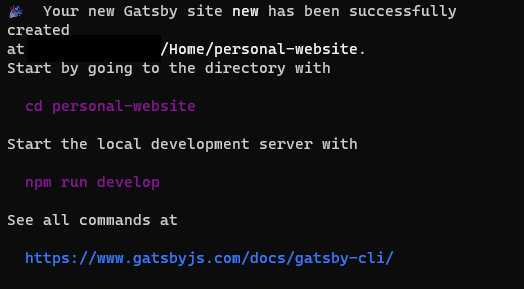
After all of the required information is entered, the last prompt asks, "Shall we do this?". All that is left from you is to enter "Yes" or "Y" and your new Gatsby site will be automatically generated by the CLI. Depending on your computer and internet speed, the time for this process to complete will vary. You'll know the site creation has been completed when you see the below message:
That's all there is to it! You are now the proud owner of a brand new Gatsby site, ready to be built into whatever your heart desires. The next step is to run it locally and see what it looks like!
Running Locally
Now that you have the code for your site, we can go ahead and run it locally to view it in your favorite browser. To get it up and running, you'll use the terminal to set up your local development server. When this development server is running, you'll be able to utilize your web browser to view and interact with a local copy of your site. This is a very useful tool, allowing you to test your code and make sure it's working as intended before you publish a new version of it to the internet.
With Gatsby, this is as simple as entering a command into your terminal, once you're in the root folder of the project you would like to start. It's important to be working within the directory of your site whenever there are any commands you would like to run. If you have just completed the gatsby new command, you'll notice the first step afterwards is to go into the directory you just created with:
cd personal-websiteOnce you're in your site's directory, running the below command will start the development server for you:
gatsby developIf you were unable to install the Gatsby CLI, or just prefer to run the server without it, you can instead use the following command to get your site up and running:
npm run developOnce Gatsby has been able to go through the necessary steps of getting your server running, the terminal should display the following message:
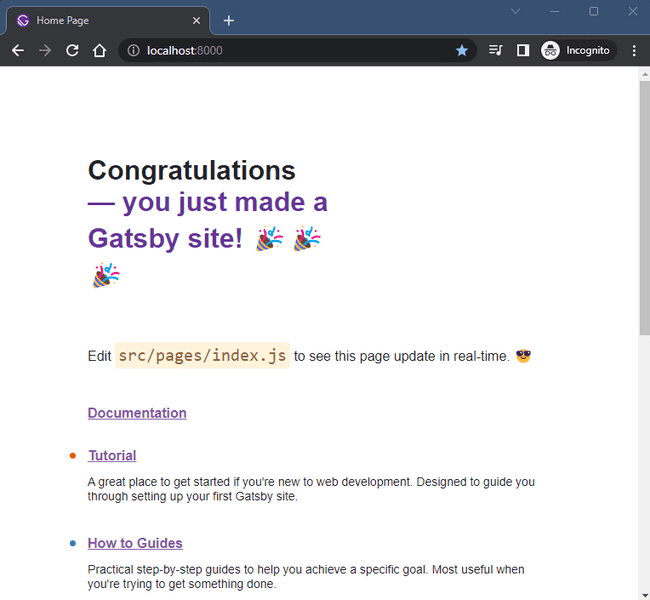
With that, you can now open your favorite web browser and view your new Gatsby site by navigating to http://localhost:8000.
You can visit this site by navigating to the address as long as your development server is running. If you would like to shut down the server, all you need to do is go back to your terminal, hold down the control key, and click "C" (ctrl-c). If you want to run your server again, all you have to do is run gatsby develop in the terminal!
That's all it takes to run your site locally, but what if you needed to do some development work on a computer other than the one your currently using? This is where Source Code Management (SCM) tools, like GitHub, are incredibly useful to work with from the very beginning.
Setting Up GitHub
SCM tools allow you and others to collaborate together on projects and contribute to the codebase from anywhere. They can help you work on your problems, move ideas forward, and learn throughout the entire process without any fear of irreversible changes. While there are many variations of this tool out there, we will be using GitHub to store and track the changes made to our codebase.
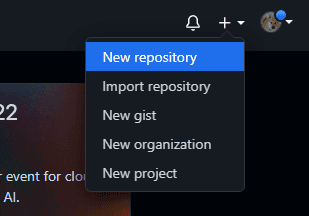
If you don't yet have a GitHub account, you can head over to github.com and create your account by clicking the "Sign Up" button in the upper right-hand corner. Once you are signed in, you will need to create a repository for your new Gatsby site. This can be done by clicking the "+" icon in the upper right-hand corner of the navigation bar and then selecting "New Repository".
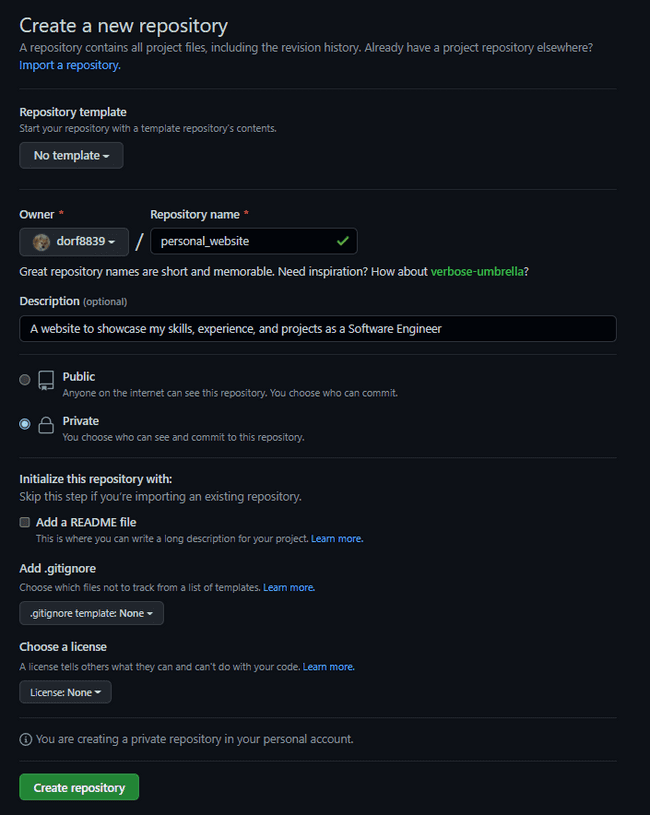
When creating the repository, be sure to give it a short, yet memorable, name. I typically go with the same name that I provided when running the gatsby new command in the terminal. I also recommend adding in a description for your website, but this is optional. In regards to whether to make the repository public or private, that choice is completely up to you. It won't have any impact on deploying your actual site and allowing others to view it, but choosing public does allow anyone to go and look at the actual code for your site. The last section contains the initialization options. As Gatsby has already included a README.md and .gitignore file in your repository when the site was being created, you can leave these two options unchecked. The choice of a license is also up to you, but for the purposes of this post, I have decided to leave it unchecked.
Once created, all that's left is to push the existing code from your computer to the new repository. You'll find instructions on how to perform these steps from your browser after the repository has been first created. They will look similar to the below screenshot that I have taken after creating my repository:
Just be sure that you are using your actual username, and the name you gave your repository, when running the git remote add origin command in the terminal. If you are using GitHub for the first time, you will likely come across an error in the terminal about permissions. To work past this, you'll need to set up a personal access token (PAT) for your GitHub account. This is so GitHub knows that you are authorizing your computer to push any code changes to your remote repo. I would recommend following GitHub's guide on Creating a personal access token to complete this part of the process.
Once you have completed those three commands from the terminal, you should be able to refresh GitHub and see your code on their servers. You can now log into GitHub from any device to view your code, as well as pull that code to any computer you would like to continue developing on. This also will make the next step of our process easier so that you can deploy your site to Netlify and finally view your new Gatsby site online!
Deploying to Netlify
There are numerous options these days to host your site, each with their own pros and cons. Some will provide better uptime or site speed, while others might have top tier customer support. Some will be free to use (up to a point), while others might only have paid options. Making the choice on which provider to go with for hosting your site can be a very difficult one, and it's important to do your research before jumping into anything.
At the time of this writing, Netlify is still a very good option to go with. It works incredibly well with Gatsby, as a static site generator, as you will be deploying your site to a global edge network. It also allows for live site previews in a staging environment, where you can collaborate with others before moving the site to a production environment. You get instant rollbacks to any version of your site, as well as the deployment of static assets and the use of dynamic serverless functions. All of these options align well with the offerings of Gatsby and the best part is that it comes with a Free Tier!
Still yet, you may want to stick closer to the Gatsby tutorial and build your site with Gatsby Cloud. This is a fair choice as it is specifically optimized for building, deploying, and hosting Gatsby sites. If you choose to go with Gatsby Cloud, I would recommend following their tutorial on getting started with the service. Otherwise, continue reading below on deploying with Netlify.
- Sign up for Netlify by clicking on the "Sign Up" button in the upper right-hand corner
- On the Team Overview page, click on "Add new site" and select "Import an existing project"
- Under "Connect to Git Provider", select the "GitHub" button
- If this is your first time connecting GitHub to Netlify, you'll need to give Netlify permission to access your GitHub account
- A new browser window should open, where GitHub will ask you if you would like to give Netlify access to your GitHub repos towards the bottom of the window. You can choose whether to give access to all of them or to specific repositories. You only need to give access to this current repo, if so desired. Then click "Save" to continue on.
- When you return to Netlify, the repository list should contain the GitHub repos you allowed. Select your blog site repo.
- After selecting your repo, you will be able to modify some configuration values, such as the owner within your Netlify account, as well as the branch to deploy. Leave the default settings and click the "Deploy site" button
- Netlify will begin building your site automatically and you'll be taken to a dashboard where you can see the status of your deployments, steps to further set up your site, and other critical information about your site.
- After the site is built, you'll see a link to your new site, which is automatically hosted on Netlify!
That's all there is to it. You're site is now online and can be viewed by anyone!👏
Any time you push a change to the main branch of the GitHub repo linked to this site, Netlify will automatically begin building a new version of your site and publish online. Also, any time you create a Pull Request pointing to your main branch, Netlify will automatically build a version of that in a staging environment to assist you with debugging before it goes live!
Congratulations!🎉 You have just created a Gatsby site! If this was the first site you've ever created, this could seem like a very cumbersome process but I promise you that the next time through will be a walk in the park. Let's go ahead and recap everything that we just did:
- We created a Gatsby site on our local machine using the Gatsby CLI
- The terminal was then utilized to run the Gatsby site locally, where you could view the website at
http://localhost:8000. - We then set up a GitHub repo and pushed our local code to their servers, allowing you to view your code online and pull it to any authorized computer
- Finally, we deployed your code to Netlify to build a hosted version of your site so that any users with an internet connection can view it
From here, we will continue on to using some of the plugins you installed while creating the site, alongside GraphQL, to build all the pages you need for your blog site using only templates. This is really where you can make the site your own, utilizing React and CSS to style the pages however you see fit. I hope you enjoyed this post and found it's content helpful as you continue your journey through web development! The links to my social media accounts can be found on the contact page of my website. Please feel free to share any of your own experiences with creating a Gatsby site, general questions and comments, or even other topics you would like me to write about. Thank you and I look forward to hearing from you!👋
